
بناء Workflow أتمتة متكامل في n8n | Build a Complete Automation Workflow in n8n
تعلّم ببساطة، خطوة بخطوة
Learn simply, step by step
معلومة واضحة، ثم خطوة جديدة.
Clear knowledge, one step at a time.
بناء Workflow أتمتة متكامل في n8n Build a Complete Automation Workflow in n8n
مشروع عملي: بناء Workflow في n8n
في هذا الدرس سنطبق ما تعلمناه في المستوى المتوسط من خلال بناء Workflow في n8n يجمع عدة مهارات داخل مشروع واحد، بداية من تشغيل الأتمتة وجلب البيانات من API وحتى معالجة البيانات واتخاذ القرار وتنفيذ الإجراء والتعامل مع الأخطاء.
الهدف ليس إنشاء Workflow معقد، ولكن فهم كيف يمكن ربط المهارات التي تعلمناها في الدروس السابقة لبناء عملية أتمتة متكاملة ومنظمة.
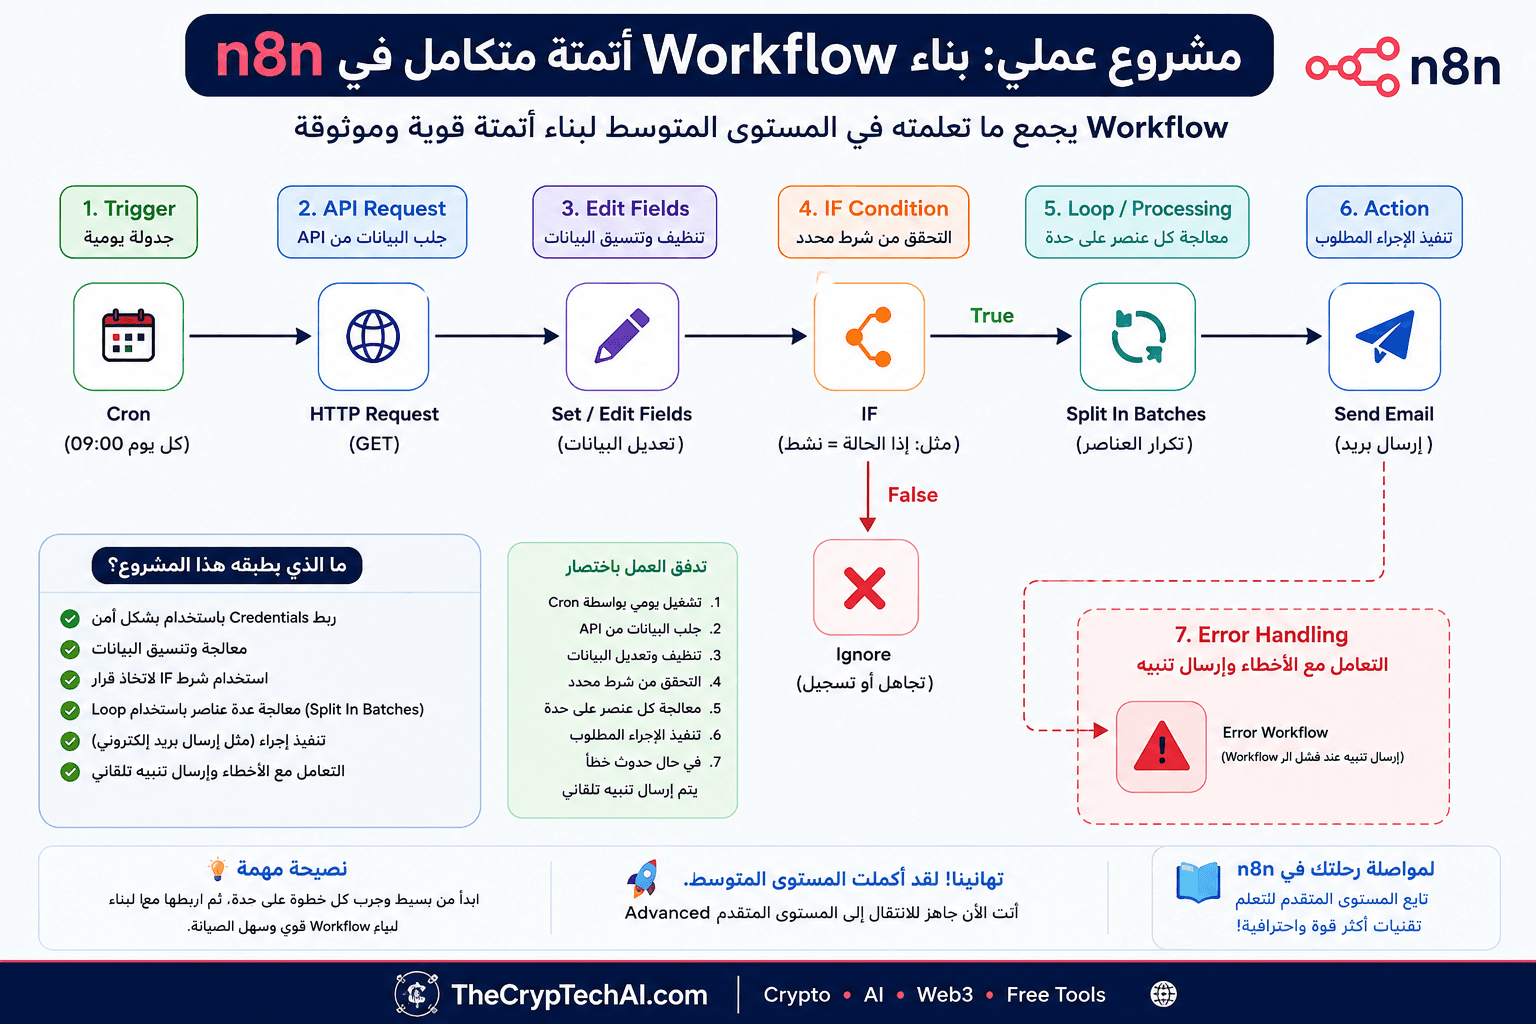
فكرة الـWorkflow
سنفترض أننا نريد إنشاء Workflow يعمل تلقائيًا كل يوم، ويحصل على مجموعة من البيانات من API، ثم ينظم البيانات ويتحقق من شرط معين قبل تنفيذ الإجراء المطلوب.
سيكون تسلسل المشروع بالشكل التالي:
Trigger → API Request → Edit Fields → IF → Loop / Processing → Action
وسنضيف أيضًا طريقة للتعامل مع الأخطاء حتى نعرف إذا فشل التنفيذ.
الخطوة 1: تشغيل الـWorkflow
نبدأ بإضافة Trigger لتحديد متى يتم تشغيل الـWorkflow. يمكن مثلًا استخدام Schedule Trigger لتشغيل العملية مرة يوميًا في وقت محدد.
يساعدك بناء Workflow في n8n بهذه الطريقة على تقسيم مشروع الأتمتة إلى مراحل واضحة، بحيث تستطيع اختبار كل مرحلة قبل الانتقال إلى المرحلة التالية.
بهذه الطريقة لا نحتاج إلى تشغيل الـWorkflow يدويًا في كل مرة.
الخطوة 2: جلب البيانات من API
بعد تشغيل الـWorkflow نستخدم عقدة مثل HTTP Request للحصول على البيانات من API خارجي.
قبل الانتقال إلى الخطوات التالية، اختبر الطلب وتأكد من أن الـAPI يعيد البيانات التي تحتاجها بالشكل المتوقع.
الخطوة 3: تجهيز البيانات
قد يعيد API عددًا كبيرًا من الحقول، بينما نحتاج إلى جزء صغير منها فقط.
يمكن استخدام Edit Fields (Set) لتنظيم البيانات، الاحتفاظ بالقيم المطلوبة، أو إنشاء حقول جديدة قبل تمريرها إلى بقية الـWorkflow.
هذه الخطوة تجعل البيانات أبسط وأسهل في الاستخدام داخل العقد التالية.
الخطوة 4: اتخاذ قرار باستخدام IF
بعد تجهيز البيانات يمكن استخدام عقدة IF للتحقق من شرط معين.
على سبيل المثال، إذا كانت البيانات تحتوي على حقل باسم status، يمكن تنفيذ الإجراء فقط عندما تكون قيمته active.
إذا تحقق الشرط ينتقل العنصر إلى مسار True، وإذا لم يتحقق يمكن تجاهله أو تسجيله أو توجيهه إلى مسار مختلف.
الخطوة 5: معالجة عدة عناصر
إذا أعاد API عدة Items، فإن العديد من عقد n8n تستطيع التعامل معها تلقائيًا.
لكن عندما نحتاج إلى التحكم في طريقة معالجة عدد كبير من العناصر أو تقسيمها إلى دفعات، يمكن استخدام Loop Over Items.
تذكّر أن وجود عدة Items لا يعني أننا نحتاج دائمًا إلى Loop. استخدمه عندما تحتاج إلى تحكم إضافي في التكرار أو الدفعات.
الخطوة 6: تنفيذ الإجراء
بعد اجتياز البيانات للشروط والمعالجة المطلوبة، نصل إلى الإجراء النهائي.
قد يكون هذا الإجراء إرسال بريد إلكتروني، إرسال إشعار، حفظ البيانات، تحديث سجل، أو إرسال المعلومات إلى API آخر.
الإجراء النهائي يعتمد على الهدف الحقيقي من عملية الأتمتة التي تقوم ببنائها.
استخدام Credentials بأمان
إذا كانت إحدى الخدمات المستخدمة في المشروع تحتاج إلى API Key أو Token أو OAuth، استخدم Credentials في n8n لإدارة بيانات المصادقة بدلًا من كشف البيانات الحساسة داخل الـWorkflow.
ولا تعرض مفاتيح API أو Tokens في Screenshots أو فيديوهات أو أمثلة عامة.
الخطوة 7: التعامل مع الأخطاء
حتى إذا كان الـWorkflow يعمل بشكل صحيح أثناء الاختبار، فقد تحدث أخطاء لاحقًا بسبب API أو الشبكة أو البيانات أو إحدى الخدمات الخارجية.
لذلك يجب التفكير في Error Handling كجزء من تصميم المشروع وليس كخطوة نضيفها فقط بعد حدوث المشكلة.
يمكن مثلًا إنشاء Error Workflow لإرسال تنبيه عند فشل التنفيذ، واستخدام Retry On Fail في الحالات المناسبة عندما يكون الخطأ مؤقتًا.
اختبر الـWorkflow خطوة بخطوة
لا تبنِ جميع أجزاء المشروع ثم تختبرها مرة واحدة. ابدأ بالـTrigger، ثم اختبر API، وبعدها معالجة البيانات، ثم IF، ثم بقية العقد.
الاختبار التدريجي يجعل اكتشاف الأخطاء أسهل بكثير ويمنعك من البحث عن المشكلة داخل Workflow كبير.
ماذا طبقنا في هذا المشروع؟
- تشغيل Workflow تلقائيًا.
- الحصول على البيانات من API.
- معالجة وتنظيم البيانات.
- استخدام IF لاتخاذ قرار.
- التعامل مع عدة Items عند الحاجة.
- استخدام Credentials بأمان.
- تنفيذ إجراء تلقائي.
- التعامل مع الأخطاء ومراقبة حالات الفشل.
يمكنك الرجوع إلى
توثيق Workflows الرسمي في n8n
لمعرفة المزيد عن إنشاء وإدارة Workflows.
كما يمكنك زيارة
أدوات TheCrypTechAI المجانية
لرؤية أمثلة مختلفة لأدوات يمكن الاستفادة من أفكارها عند بناء مشاريع الأتمتة.
ومع التدريب على بناء Workflow في n8n أكثر من مرة، ستصبح قادرًا على تحويل الكثير من المهام المتكررة إلى عمليات أتمتة منظمة تعمل بشكل تلقائي.
الخلاصة
أصبحت الآن قادرًا على بناء Workflow في n8n يجمع APIs ومعالجة البيانات والشروط والتعامل مع عدة عناصر وCredentials وإدارة الأخطاء داخل عملية أتمتة واحدة.
وبإكمال هذا المشروع تكون قد أنهيت المستوى المتوسط في n8n. الخطوة التالية هي المستوى المتقدم، حيث يمكن الانتقال إلى موضوعات أقوى مثل Advanced Webhooks وSub-workflows وقواعد البيانات وAI Agents وتحسين Workflows للاستخدام الفعلي.
Practical Project: Build n8n Workflow
In this lesson, you will apply what you learned throughout the intermediate level by building an n8n workflow that combines several automation skills in one practical project, from triggering the automation and retrieving API data to processing information, making decisions, executing actions, and handling errors.
The goal is not to create a complicated workflow. Instead, you will learn how to connect the skills from the previous lessons to build a complete and organized automation process.
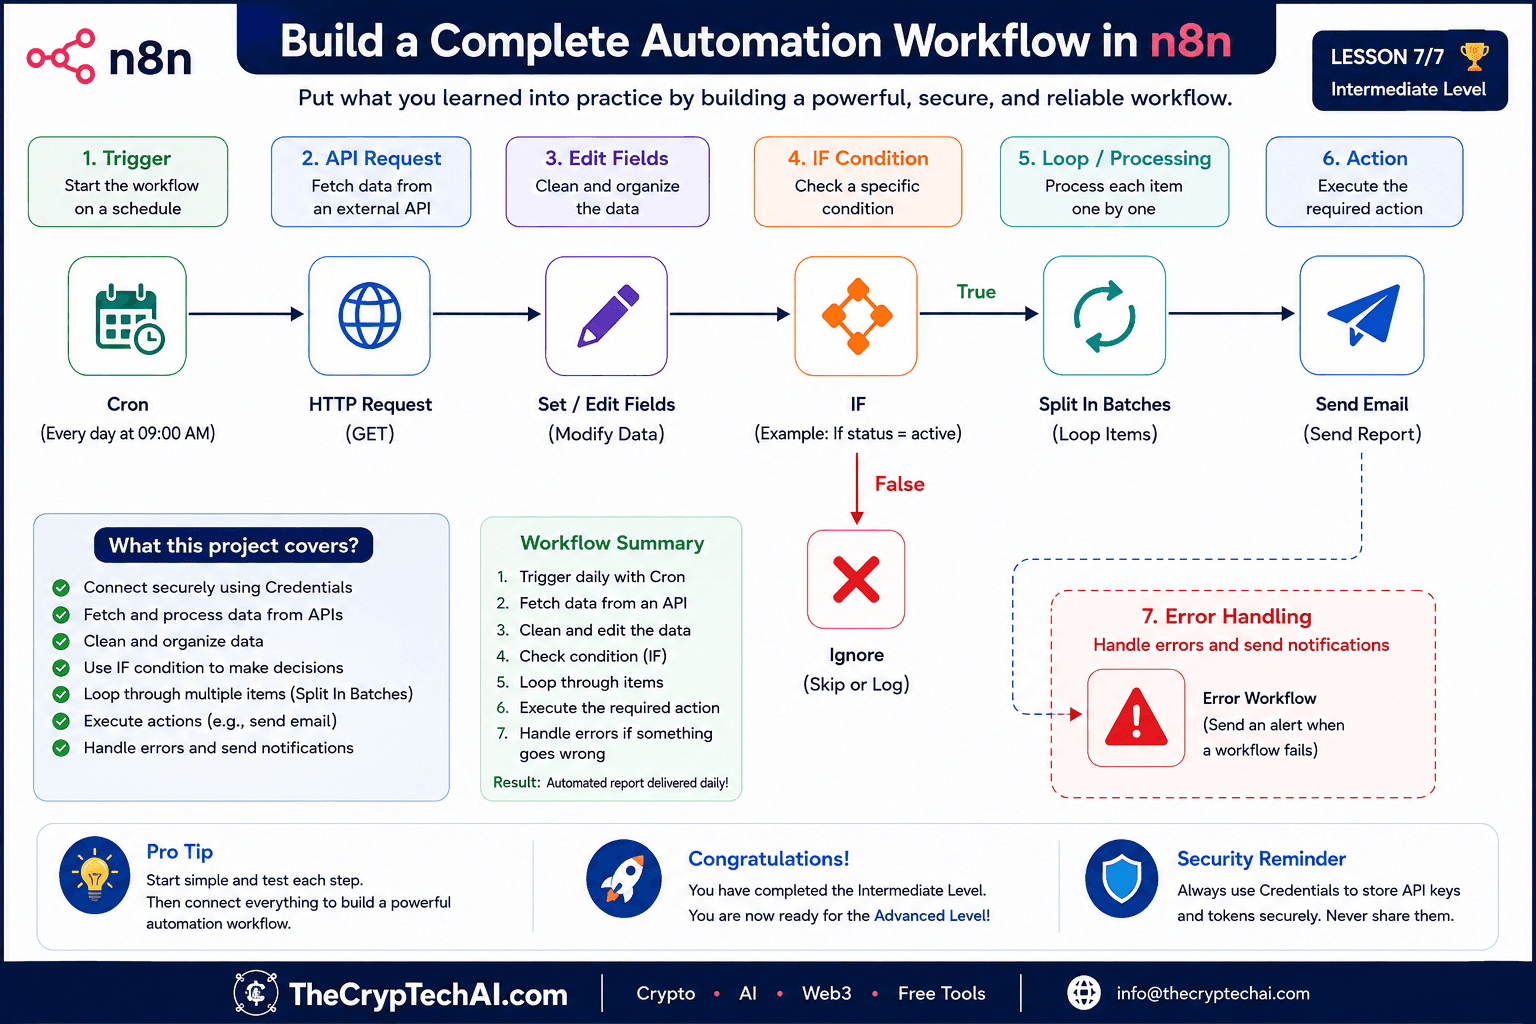
Workflow Project Idea
Imagine that you want to create a workflow that runs automatically every day, retrieves a collection of data from an API, organizes the information, checks a specific condition, and then performs the required action.
The project flow will look like this:
Trigger → API Request → Edit Fields → IF → Loop / Processing → Action
We will also include error handling so that failures can be detected and managed properly.
Step 1: Trigger the Workflow
Start by adding a Trigger that determines when the workflow should run. For example, you can use a Schedule Trigger to start the automation once every day at a specific time.
This allows the workflow to run automatically without requiring you to start it manually each time.
Step 2: Retrieve Data from an API
After triggering the workflow, use a node such as HTTP Request to retrieve data from an external API.
Before continuing, test the request and confirm that the API returns the information you need in the expected format.
Step 3: Prepare the Data
An API may return many fields even though your workflow only needs a few of them.
You can use Edit Fields (Set) to organize the data, keep the required values, or create new fields before passing the information to the next workflow steps.
This makes your data cleaner and easier to work with.
Step 4: Make a Decision Using IF
After preparing the data, use the IF node to check a specific condition.
For example, if the data contains a field called status, the workflow could perform the next action only when its value is active.
If the condition is true, the item continues through the True path. Otherwise, it can be ignored, logged, or sent through another path.
Step 5: Process Multiple Items
If the API returns multiple items, many n8n nodes can process them automatically.
However, when you need more control over a large number of items or want to process them in batches, you can use Loop Over Items.
Remember that multiple items do not automatically mean that you need a loop. Use Loop Over Items when additional control over repetition or batch processing is required.
Step 6: Execute the Action
After the data passes through the required conditions and processing steps, the workflow reaches its final action.
This action could send an email, deliver a notification, save information, update a record, or send the processed data to another API.
The final action depends on the actual goal of the automation you are building.
Use Credentials Securely
If one of the services in your project requires an API Key, Token, or OAuth authentication, use Credentials in n8n to manage authentication information securely instead of exposing sensitive data inside the workflow.
Never expose API keys or tokens in screenshots, tutorial videos, or public examples.
Step 7: Handle Errors
Even when your workflow works correctly during testing, errors can happen later because of an API, network connection, invalid data, or an external service.
For this reason, Error Handling should be considered part of the workflow design rather than something added only after a problem occurs.
For example, you can create an Error Workflow that sends an alert when an execution fails. Retry On Fail can also be useful when an error is temporary and retrying the operation is appropriate.
Test the Workflow Step by Step
Do not build every part of the project and test everything only at the end. Start with the Trigger, test the API request, then test data processing, IF conditions, and the remaining nodes one step at a time.
Testing gradually makes troubleshooting much easier and helps you identify exactly where a problem occurs.
What Did You Apply in This Project?
- Triggering a workflow automatically.
- Retrieving data from an API.
- Processing and organizing data.
- Using IF to make decisions.
- Processing multiple items when required.
- Using Credentials securely.
- Executing an automated action.
- Handling errors and monitoring failures.
You can learn more from the
official n8n workflow documentation.
You can also explore
TheCrypTechAI free online tools
to see different tools and ideas that can inspire future automation projects.
Summary
You now know how to build an n8n workflow that combines APIs, data processing, conditions, multiple-item processing, Credentials, automated actions, and error handling in one complete automation process.
By completing this project, you have finished the Intermediate n8n Automation level. The next step is the Advanced level, where you can explore more powerful topics such as Advanced Webhooks, Sub-workflows, databases, AI Agents, and workflow optimization for real-world production environments.
اختبر فهمك
Check Your Understanding
سؤالان سريعان لتثبيت أهم ما تعلمته.
Two quick questions to reinforce the key ideas.